Investigations
Our mission is much more than simply creating an easy-to-use server security software. We want to make the Internet a safer place! That's why we work hard to help everyone in protecting their servers and keeping them clean.
Incident Reports Explained
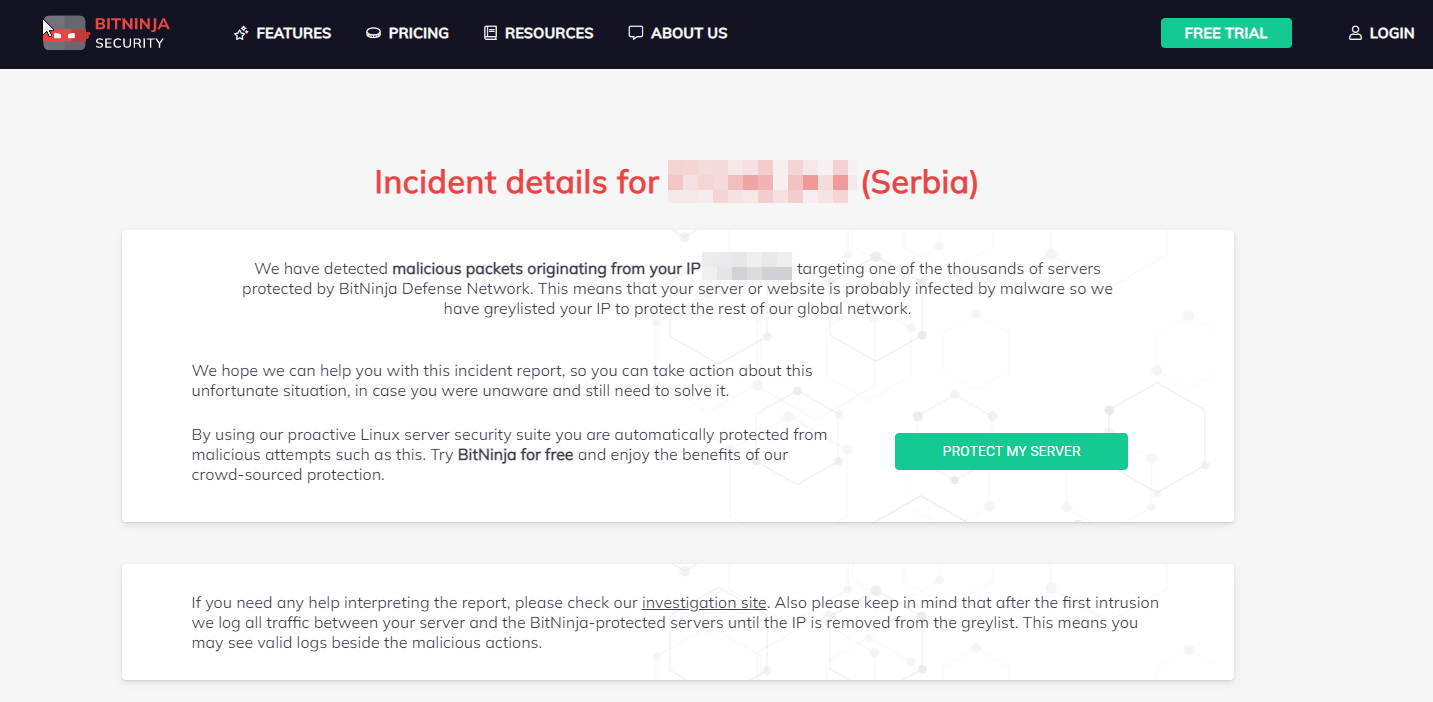
If you received an incident report from BitNinja, your server or a website is probably infected by malware. How do we know? Every server protected by BitNinja is not only secured, but also part of a global security information network (called Defense Network). Any attack against a BitNinja protected server generates an incident that we store in our central database. Every week we aggregate the collected incidents and send a report to the owner of the source IP of the attack.
Why do we do this? In most cases, the owner of the infected server doesn't even know that their server is being used by hackers. Your server can be a part of even more botnets. The incidents we capture are only a portion of the malicious activity your server might be a part of! Your server may be used for different cybercrimes such as SPAM, DDoS attacks, phishing, different frauds, etc. If a server is infected, in many cases more than 50% of the server's resources are used by the hackers and not by the owner!
We believe we can help server owners by informing them about the attacks generated by their servers. We send no more than 1 email per IP per week. We have an incident report page for every IP. You can always find the latest incidents collected by our defense network on the incident report page.
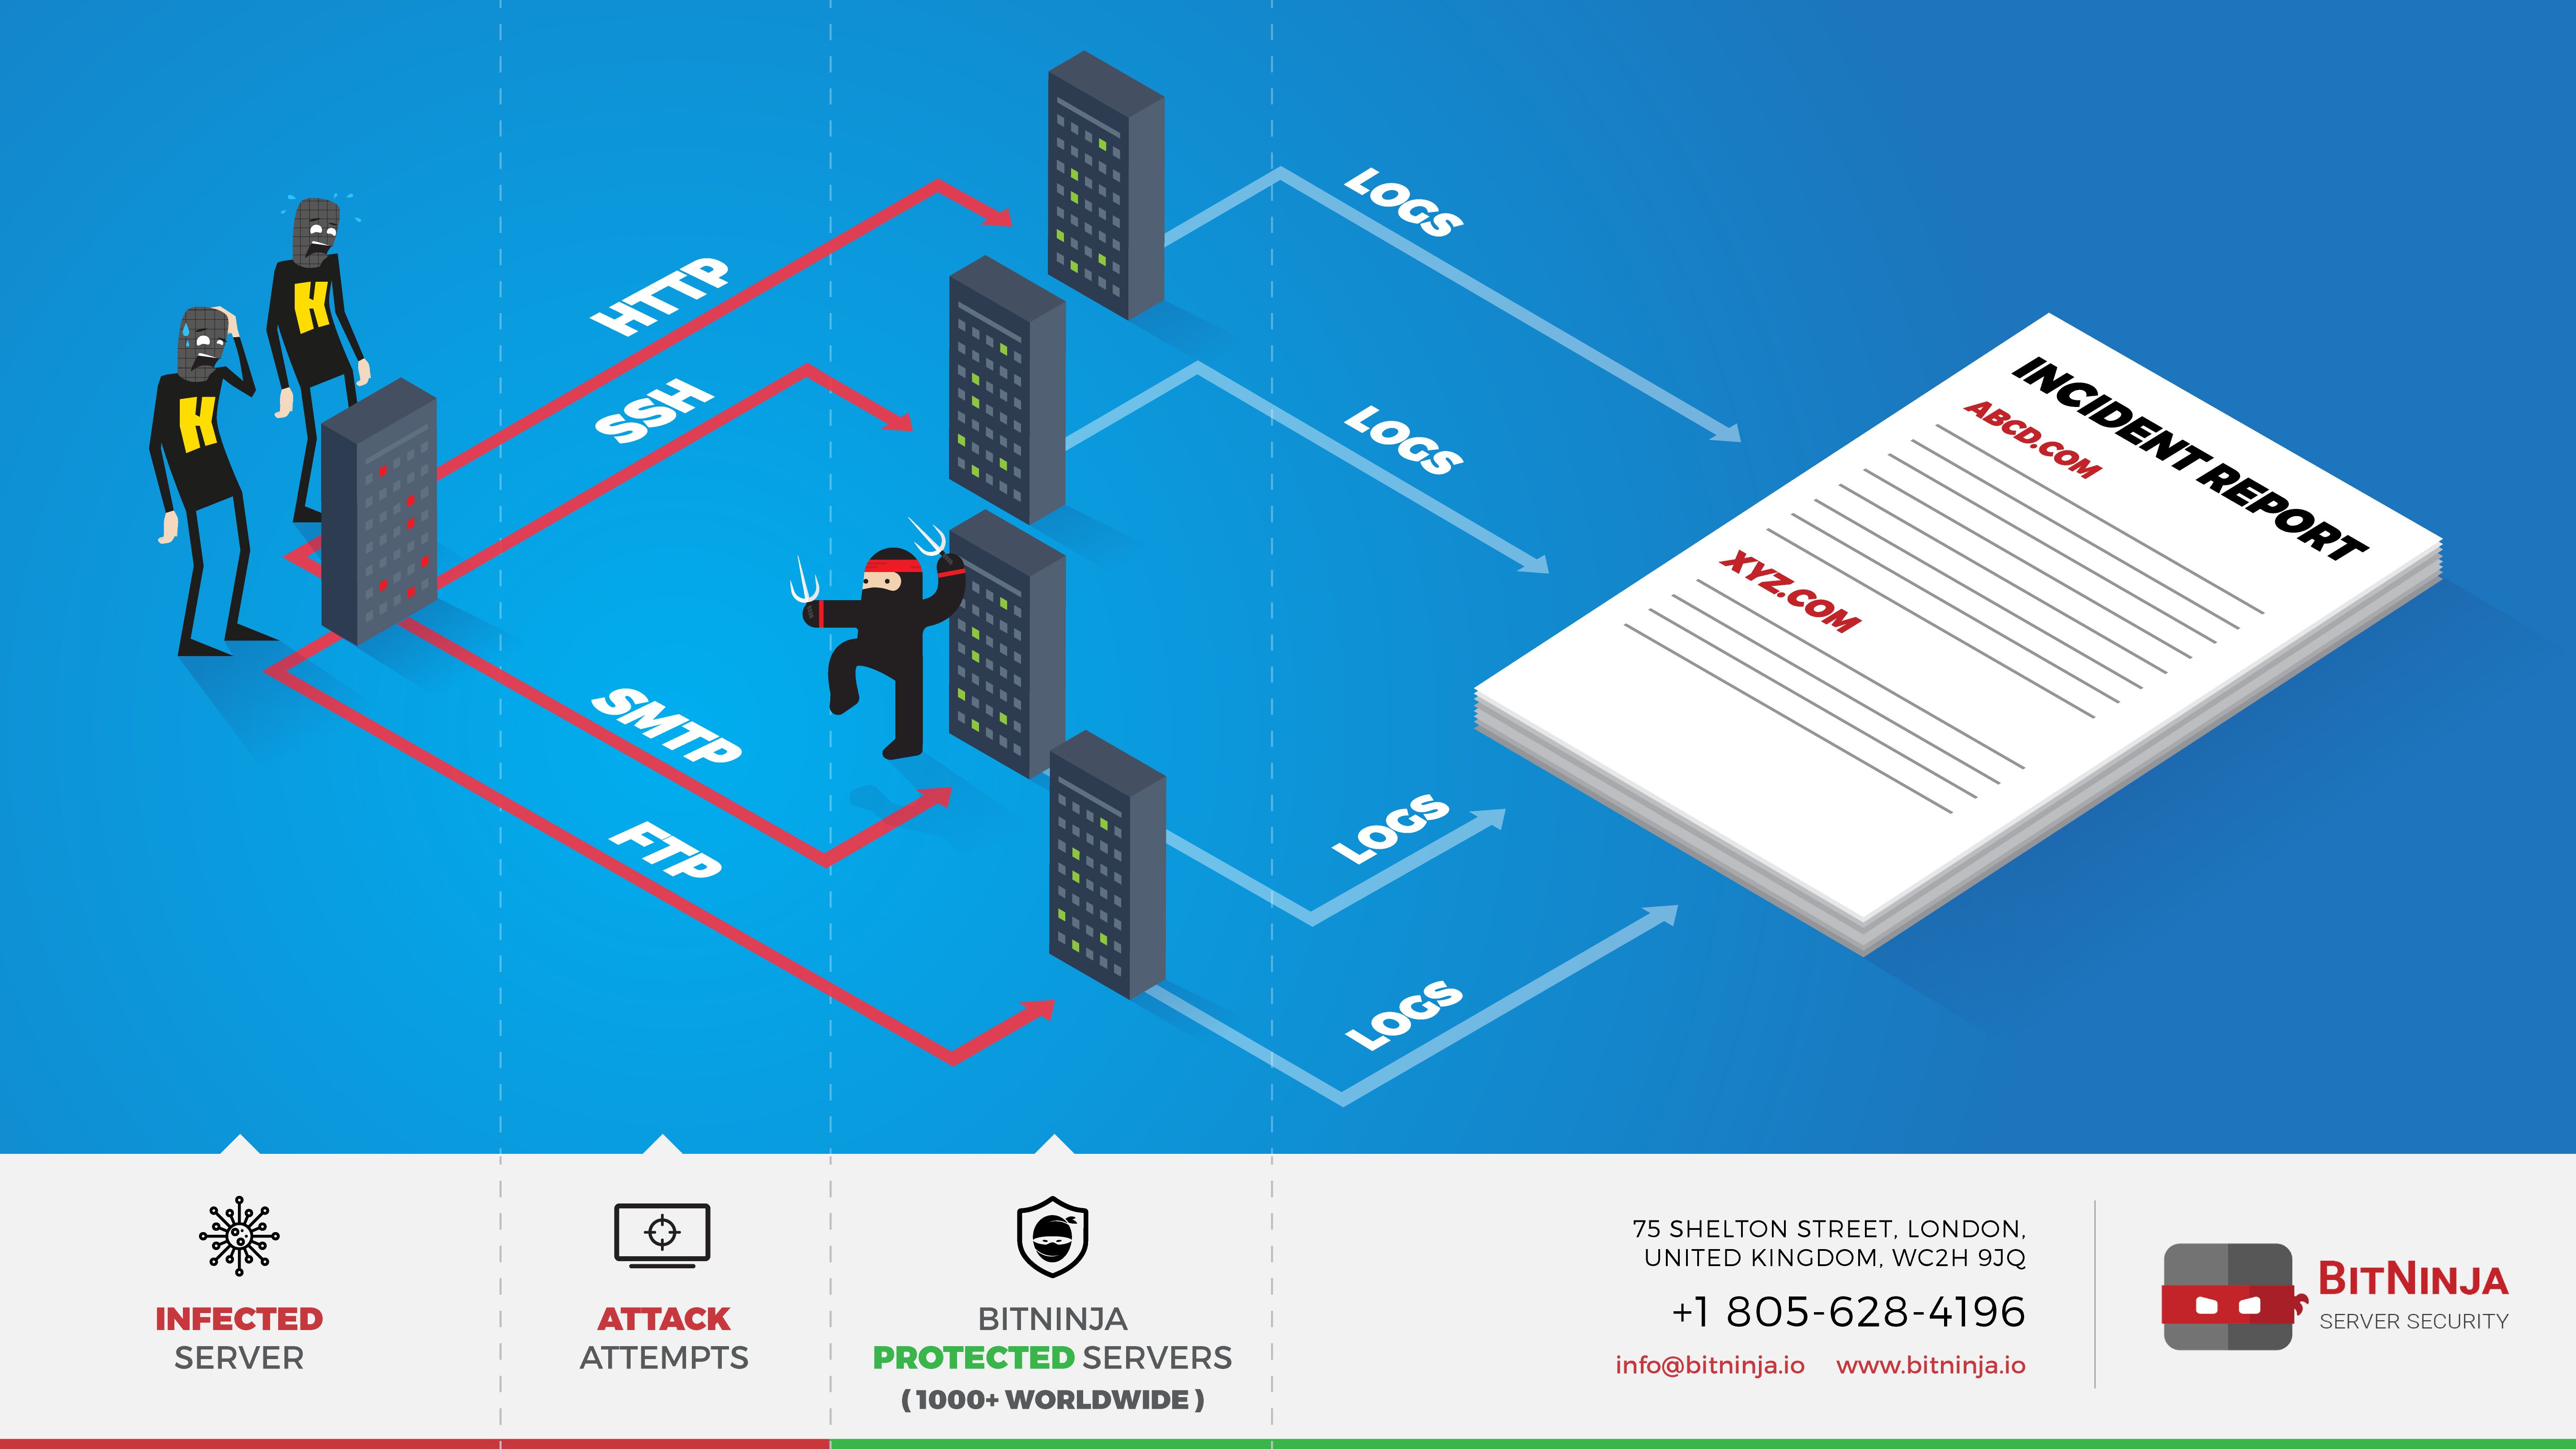
Your infected server is sending dangerous requests to other servers. Some of the victims are protected by BitNinja, so we can protect servers against the attack and record the requests to show you what your server does. You can read more about this topic on our blog about how hackers infect servers. https://bitninja.com/blog/how-botnets-expand-and-how-to-protect-against-them/
The Header
An example of our incident report page looks like this.
Incident Details
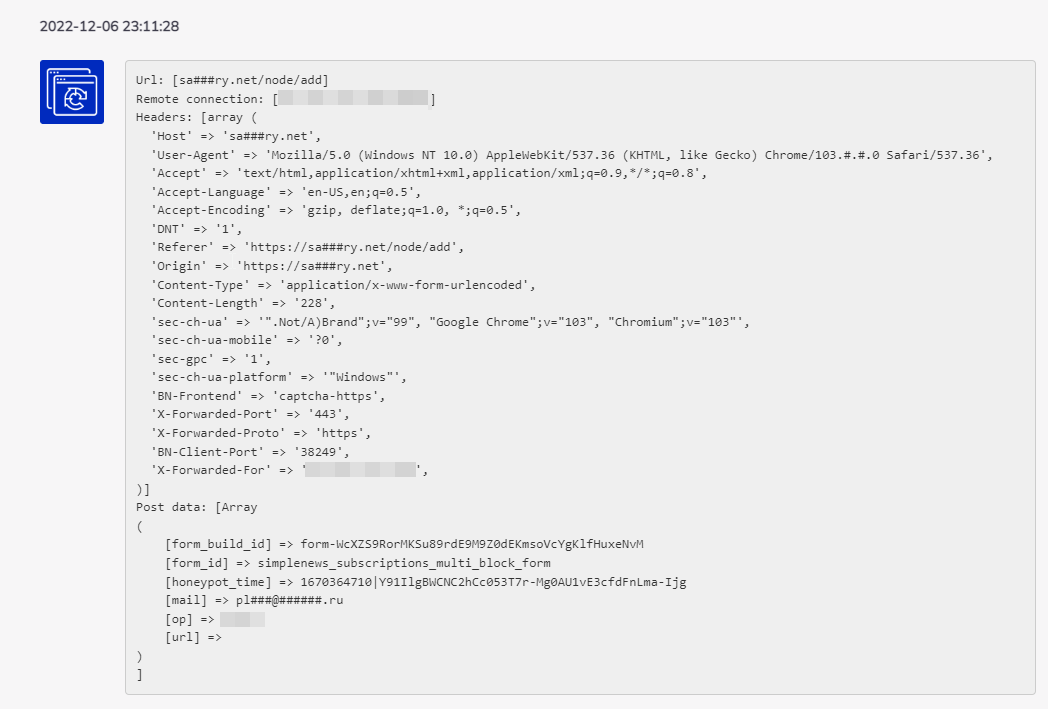
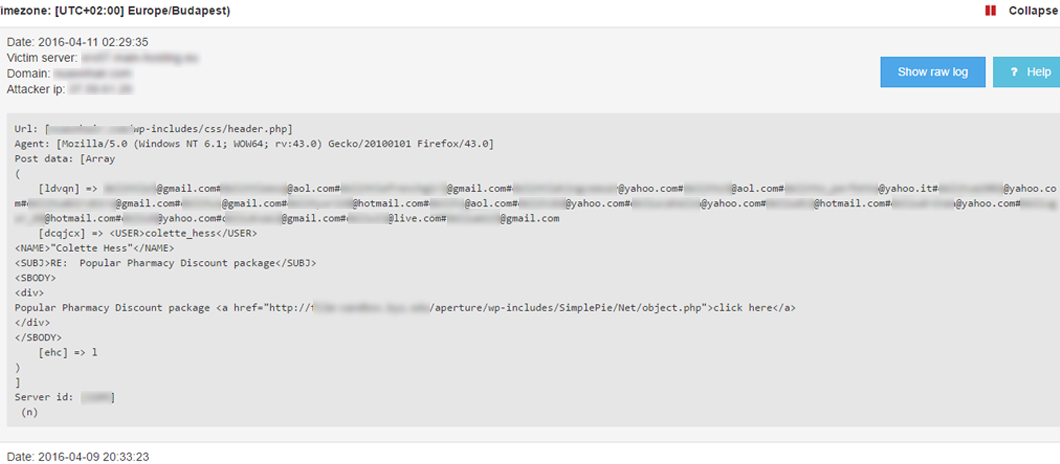
This is a typical incident captured by BitNinja. The parts of the incident are:
(1) URL: In case of a HTTP request registered by us we save the URL. This URL has nothing to do about sites hosted by the infected server! This is the URL requested by the infected server, and hosted by our clients. We cover hostnames and IP addresses in our public reports as this is sensitive information. We can send you the original logs upon request via email. You can use the URL to filter for outgoing connections or to capture matching packages.
(2) Agent: The user agent as we receive it. Many cases the user agent is spoofed as it is very easy to spoof the user agent of a request.
(3) Post data: We also store the POST/GET data sent by your server. You can use this data to filter for outgoing requests or to capture matching packages.
Types of incidents
BitNinja supports many different modules for defending against attacks. We can detect and defend a wide range of attacks and register many different incidents. Here you can find the most common incident types.
HTTP spam request
This is an encrypted spam command request. Your infected server sends a request to a URL where the botnet believes there is an infected file that can be used to send out spam. The request is weakly encrypted, using simple methods like base64_encode, shift, etc. After decrypting the message with BitNinja, you can see the purpose of the request clearly:
HTTP brute force
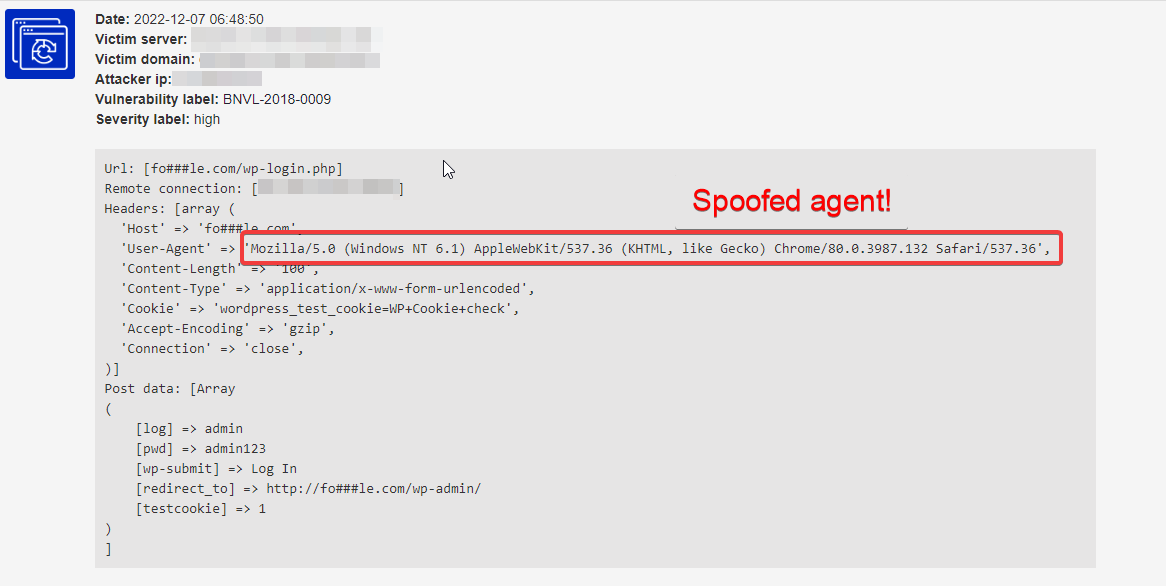
This is a typical brute force attempt. There are different kinds of brute force attacks. Sometimes one IP is used to try different username/password combinations against a website and sometimes a whole botnet is trying different password combinations in a distributed way. You can also see the user agent has been spoofed. It advertises itself as Opera/9.80, but as this traffic was coming from a server, not an end-user device, this has been spoofed for sure.
HTTP script injection

Your server is used by hackers to infect other servers using a technique called script injection. After decrypting the URL parameter, you will get different URLs that will be downloaded by a backdoor script planted earlier.
Information leakage

Your server is used for hacking other web servers and hosting different CMS systems. There are many different methods of this attack type.
Application level DoS attack
The resources of your server have been used to attack other innocent servers and deny their services. Sometimes your server is not compromised, only some unsafe code has been exploited, like the WordPress Brute Force Amplification Attack in the xmlrpc.php or the vulnerability in the google_maps wordpress plugin. There are many similar vulnerabilities in many CMS systems, too.
SSH brute force
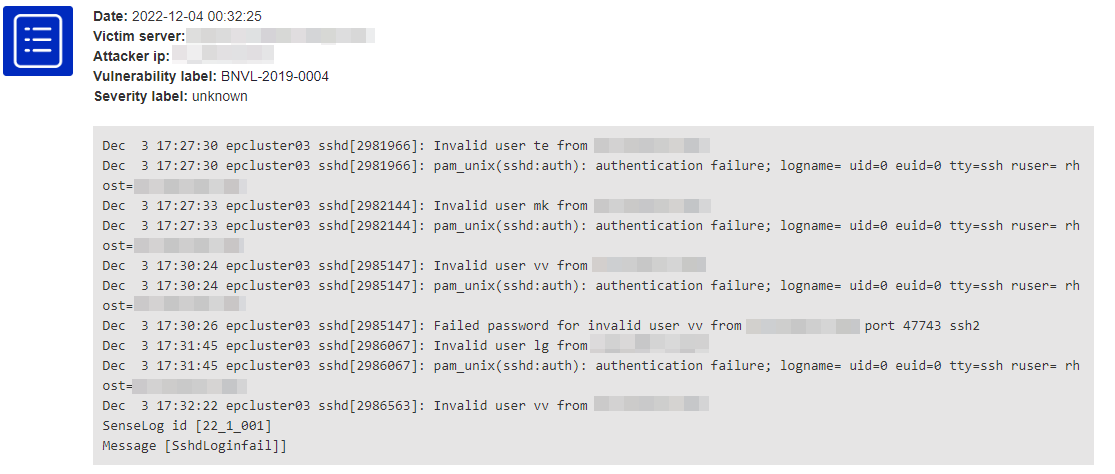
To make your server do brute force SSH login requests, your server has to be compromised seriously. In this case it is very important to take steps. HTTP requests can be caused by hacked websites easily, but SSH login attempts mean a serious infection of your server.
This is just a subset of a wide range of incoming incidents. If you haven't found yours, please feel free to contact us. We are always happy to help!
Detecting outgoing http attacks
If your server or website has already been compromised and your server is sending out malicious HTTP requests like scans, brute force attempts, etc. You can detect and log the outgoing packets and find out which user caused the problem by adding the following iptables rule.
This rule will log any packet that leaves your server and targets port 80. It also logs the user id so you can identify which user initiated the request. To avoid flooding, we limit the number of logs to 5 per minute. You can increase or decrease this number if you need to fine tune.
iptables -I OUTPUT -p tcp -m tcp --dport 80 -j LOG --log-uid -m limit --limit=5/minute --log-prefix BITNINJA
After running this command, you have to monitor the kernel log for any captured packets. You can see the kernel logs with this command:
dmesg -T
On some older versions of dmesg the -T option is not supported. In this case you can simply run dmesg.
An example of packets made by root. (UID=0 GID=0)
[Wed Jan 20 09:57:00 2016] BITNINJAIN= OUT=lo SRC=10.0.3.131 DST=14.321.31.11 LEN=52 TOS=0x00 PREC=0x00 TTL=64 ID=63055 DF PROTO=TCP SPT=48430 DPT=80 WINDOW=256 RES=0x00 ACK URGP=0 UID=0 GID=0 MARK=0x1
An example of packets initiated by a user (UID=13576 GID=13576)
[Wed Jan 20 10:00:13 2016] BITNINJAIN= OUT=lo SRC=X.X.35.131 DST=Y.Y.110.40 LEN=60 TOS=0x00 PREC=0x00 TTL=64 ID=22964 DF PROTO=TCP SPT=38694 DPT=80 WINDOW=32792 RES=0x00 SYN URGP=0 UID=13576 GID=13576 MARK=0x1
You can delete the log iptables rule with this command:
iptables -D OUTPUT -p tcp -m tcp --dport 80 -j LOG --log-uid -m limit --limit=5/minute --log-prefix BITNINJA
We are planning to integrate this process into BitNinja in the near future.
There are cases when only finding the user who sent the packet is not really
useful. For example, if a malicious or vulnerable script is used to send the
packet and you use PHP as an Apache module, the sender will be the user who runs
the apache2 service, which is usually www-data.
However, these scripts must be controlled via HTTP requests, which we can find in the log of the HTTP services. We know the time when the packet was sent from iptables' log entry, so we can narrow down the list of the vulnerable or malicious scripts by searching for control messages in the HTTP daemon's access log which were received when the outgoing packet was sent.
If you have legitimate outgoing packets, you may need to record the outgoing traffic
so that you can analyze it, search for malicious requests, and find the malicious
or vulnerable scripts as we described above. You can use tcpdump for this:
tcpdump dst port 80 -w outbound_http.tcpdump
The command above will write every packet - which was sent to port 80 - into the
outbound_http.tcpdump file. Please note, that the file can grow large quite quickly
if you have a significant amount of outbound traffic to port 80.
You can use Wireshark to view the data collected by tcpdump. You only need to
install it onto your workstation, download the dump file from the server, and open
it. You can use HTTP as a filter to hide TCP packets without HTTP data. When you
find a malicious request, you can change the way of how the time is displayed by
selecting the appropriate format from the Time Display Format submenu of the View menu.
Discovering blocked IPs
If you experience any issues while visiting or updating a website, but the site's IP address is not on the challenge list
or block list, the problem could be that one of the IP addresses, that the site is trying to connect to,
is challenge listed. In these cases the connection to that address remains in SYN_SENT state.
You can list all the IP addresses that are stuck in SYN_SENT using the following command:
netstat -ntpu | grep SYN_SENT
Using the output of this command, you can check those IP addresses that are possibly blocked by BitNinja.
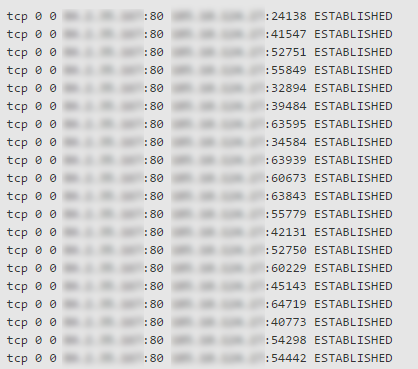
Investigating established connections
You can use the following commands to find infections:
netstat -ctupne | grep ESTABLISHED | cut -c45-1000 | grep -E ':443|:80' > connections.txt
cat connections.txt | cut -c1-50 | sort | uniq -c | sort -n > uniq.txt
In these lines netstat is used with :code-ctupne parameters to print TCP and UDP network connections continuously (every second), showing the pid and the name of the program
to which each socket belongs and showing the numeric address instead of the symbolic host. We use grep ESTABLISHED to list only those connections
that are established, and we remove the irrelevant information from the output with cut -c45-1000. The grep -E ':443|:80' command filters the output to connections
which are bound to port 443 or port 80, so it will list only HTTP and HTTPS connections.
We collect the information to the file connections.txt, and with the second line of command, we sort the lines and with uniq -c we show every IP address only once,
but count the number of connections it has. The final file, uniq.txt will contain only the foreign IP addresses with ports, the number of connections they have,
the state of the connections and the user id of the owner of the socket.
Many thanks to Eddie Bijnen from True.nl for sharing this advice!
Troubleshooting the challenge list
If you experience issues with websites that are not loading properly when BitNinja is running, there is a chance that the site
is trying to connect to a challenge listed host. We've created a script to solve these situations. The script can be found at:
/opt/bitninja/modules/Cli/scripts/debug-outbound-ip
How to use the script?
- Start BitNinja
- Run the script at
/opt/bitninja/modules/Cli/scripts/debug-outbound-ip - Try to load the website in your browser
- Watch the console where the script is running to see if there are any requests to the challenge listed IP addresses
- Delist those IP addresses
- Check if these steps solved the problem