Web Application Firewall 2.0
Starting from BitNinja version 3.16.0 is shipped with BitNinja WAF Pro (WAF3) which runs Caddy Server, replacing our previous WAF 2.0 technology (Nginx and HAProxy - SslTerminating) to take Web Application Firewall's Peformance, Security and SSL Certificate Collecting to the next level.
- Web Application Firewall 2.0
- Introduction
- Technical overview
- Compatibility
- Pre-requirements
- Enable the Transparent Proxy
- WAF 2.0 with HTTPS
- Preparing log files
- Using Apache *Required for DNAT redirection only
- Apache with Plesk
- cPanel on Apache *Required for DNAT redirection only
- cPanel on LiteSpeed server
- cPanel on an NGINX *Required for DNAT redirection only
- Installing mod_remoteip *Required for DNAT redirection only
- Installing mod_remoteip on cPanel servers *Required for DNAT redirection only
- Installing mod_rpaf on Debian/Ubuntu
- Installing mod_rpaf on CentOs and others
- Activating and Deactivating the WAF 2.0 module
- Activation
- Deactivation
- Issues with the WAF module?
- Configuration
- Web Application Firewall: Rate limiting feature
- ModSecurity
- Domain pattern configuration
- Safe implementation best practices
- Relation to other modules
- Log files
- Modifying Nginx reverse proxy settings
- FAQ
- How can I handle false positives?
- Does the WAF 2.0 work on AWS or Azure?
The web is the most vulnerable interface on most servers. Having a powerful web application firewall is an essential part of the defense toolset if you host any web content. The biggest challange of a WAF is to find the balance between security level and false positive rate. You don't want a weak web application firewall, but you can't afford many false positives either. Finding this balance was the leading cause of the WAF 2.0 BitNinja module to be born.
Introduction
Generally speaking, web application firewalls monitor, filter, and block incoming and outgoing traffic on HTTP protocol. Through analysis, it's a good protection shield against common web hacks, like injection flaws (eg. SQL injection), cross site scripting (XSS), session hijacking, remote and local file inclusions and other attacks.
We created an application layer firewall that is also known as a proxy-based firewall. You can easily activate it on the Dashboard (see instructions below).
BitNinja WAF 2.0 only scans incoming traffic currently, in real-time, with the built-in HTTP proxy solution. Upon activation, BitNinja adds an iptables rule to your nat iptables table to redirect all traffic coming from port 80 to a port dedicated for BitNinja WAF 2.0. The WAF 2.0 process analyzes the incoming traffic and makes a connection to your local HTTP server to fetch the actual content.
HTTPS support for our WAF 2.0 is also available, however in order for this to work, you must have SslTerminating enabled.
This is to ensure that the certificates are collected properly and BitNinja agent can see the attackers behind HTTPS
We maintain filter patterns, and update and fine-tune regularly with new BitNinja versions. If BitNinja finds any suspicious connections, it will challenge list the IP and send the incident to the BitNinja Analyzer Central.
Technical overview
Through the development of the original WAF module, we realized there are way too many features that we need to implement just to catch up with the open-source solutions. That's why we decided to change our technology stack here and use industry-standard technologies. We started to look for different WAF models and then decided to choose a model used by CloudFlare and Incapsula. The WAF 2.0 is based on a very fast reverse proxy engine, the well-known nginx 1.23. Plus, supported by a well-known and very reliable WAF engine (mod_security v3) and a battle-tested ruleset from the Open Web Application Security Project, the OWASP crs v3.
This setup works very well. The performance is killer. In the near future, we will constantly update and finetune the ruleset, add other rulesets and implement more and more rules. We monitor the false positive rates of all rules and based on this we can tweak risky rules on the fly, and release the fixes very often.
We ship the custom-built and tuned nginx + lib-modsecurity package with bitninja. The package is called
bitninja-waf and it installs in /opt/bintinja-waf.
The waf-manager BitNinja module is responsible for managing the nginx + lib-modsecurity stack. It automatically installs, starts, configures, reconfigures and stops the nginx instances.
When nginx is started and it is ready to accept connections for filtration, the waf-manager module sets up the redirection rules to redirect incoming traffic to the WAF 2.0. The WAF 2.0 then uses the currently used http server as a backend and pass the filtered traffic on.
Compatibility
Our bitninja-waf package is NOT compatible with the following Linux distributions:
- Ubuntu < 16.04
- Debian < 8.0 (Squeeze)
- CentOS/CloudLinux < 7
Pre-requirements
Before you enable the WAF 2.0 module, there are some steps you have to take to enjoy the full functionality of the WAF module.
The web server has to accept connections from 127.0.0.1 to http://<server_ip>:80 and to https://<server_ip>:443 in order for the WAF module to work.
Enable the Transparent Proxy
From version 2.29.5 of BitNinja the transparent mode is enabled in the WAF module by default if the agent is installed via the one-liner installation code. If the WAF module is working properly, then no further configurations are required in webservers. Use the following guide to test if the WAF module works properly with the transparent mode.
We highly recommend to switch the redirection mode from our Dashboard's Configuration page -> WAF 2.0 module's settings.
However, you may also edit the configuration on the server from the CLI.
-
Open
/etc/bitninja/WAFManager/config.iniand scroll down to the section called[redirect_options] -
Find the line saying
;redirection_mode = 'transparent'and remove the;symbol[redirect_options] ;redirection_mode = 'dnat' ;redirection_mode = 'tproxy' redirection_mode = 'transparent'
-
Save and exit
-
Don't forget to sync your local configurations to the cloud with
bitninjacli --syncconfigs -
Restart BitNinja with
service bitninja restart
If the WAF module cannot be trigered, please try to set up the X-Forwarded-For header in your webserver's config as shown below.
If you need help with the setting or you would experiece any issues do not hesitate to contact our support department.
If you use a CDN, Proxy or Load Balancer, you need to enable the Trusted Proxies module on your BitNinja dashboard.
If you wish to use Transparent proxy as well alongside with Trusted Proxies, please make sure to do the WAF 2.0 pre-requirements (see below).
WAF 2.0 with HTTPS
Our Web Application Firewall can work on HTTPS protocol, however, the SSL Certificates must be collected properly. Three options are available for these:
- ConfigParser module (the default and best option), which reads the SSL Certificate location from the configuration of your Web Server (Apache|Nginx|LiteSpeed Enterprise)/Proxy/Load Balancer.
- CertMapping, which can be used, when our ConfigParser can't detect the SSL Certificate location for variety of reasons
- CertMiner - This is pretty much like the CertMapping, however, this is more automated way than CertMapping. More details can be found on our SslTerminating page.
Preparing log files
It is very important to set your server's IP(s) as trusted proxy to see the real visitors' IP address in your server's access log files,
as well as to update the LogFormat directive in your web-server's config file (e.g. httpd.conf for Apache) to use %a instead of %h:
LogFormat %a %l %u %t \"%r\" %>s %b \"%{Referer}i\" \"%{User-Agent}i\" combined
Using Apache *Required for DNAT redirection only
Please open your Apache configuration file with your favourite text editor.
Insert the following lines at the end of the httpd.conf file.
On Debian you can find the configuration file usually at /etc/apache2/httpd.conf.
The location of this file is set at compile-time, but may be overridden with the -f command line flag.
    <IfModule remoteip_module>
        RemoteIPHeader X-Forwarded-For
        RemoteIPInternalProxy INSERT YOUR IP ADDRESS(ES) HERE
    </IfModule>
- If your Server has multiple IP addresses enter the IP addresses seperated by colon and space.
- If your server has a CIDR or multiple CIDR you can add them the same way with the prefixes included (IP address/X).
Please also check the logformat in the file if it looks like this:
%a %l %u %t \"%r\" %>s %b \"%{Referer}i\" \"%{User-Agent}i\" combined
You can find strings in the files in most text editors with Ctr+W and then typing the string you are looking for, e.g. „combined”.
Apache with Plesk
In Plesk this configuration is not necessary as the X-Forwarded-For header is already included with all IP addresses of the server in the configuration files of all web server applications. If remoteip is not enabled yet, you need to enable remoteip from Plesk.
- Go to Tools and settings
- Apache Web Server
- Tick in remoteip's checkbox under Apache modules

cPanel on Apache *Required for DNAT redirection only
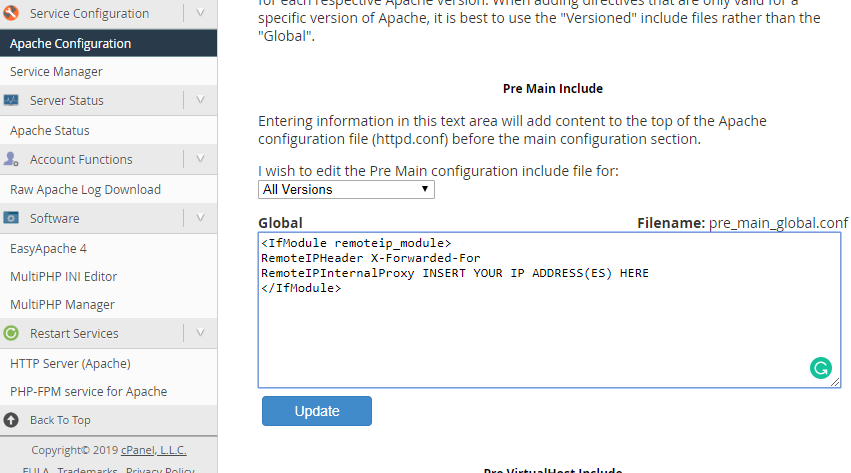
You can find the Apache configuration menu by typing Apache into the search field of cPanel/WHM, or please go to the Pre Main Include menu of Apache. You can find it like this:
- cPanel/WHM
- Home
- Service Configuration
- Apache Configuration
- Include Editor
- Pre Main Include (choose All version)
- Please enter the following text into the textfield:
    <IfModule remoteip_module>
        RemoteIPHeader X-Forwarded-For
        RemoteIPInternalProxy INSERT YOUR IP ADDRESS(ES) HERE
    </IfModule>
- If your Server has multiple IP addresses enter the IP addresses seperated by colon and space.
- If your server has a CIDR or multiple CIDR you can add them the same way with the prefixes included (IP address/X).
Please also check if the logformat looks like this:
%a %l %u %t \"%r\" %>s %b \"%{Referer}i\" \"%{User-Agent}i\" combined
You can find it at:
- cPanel/WHM
- Home
- Service Configuration
- Apache Configuration
- Global Configuration
in the LogFormat (combined) field. If it looks like above there is nothing to do, if not please change it to:
%a %l %u %t \"%r\" %>s %b \"%{Referer}i\" \"%{User-Agent}i\" combined
cPanel on LiteSpeed server
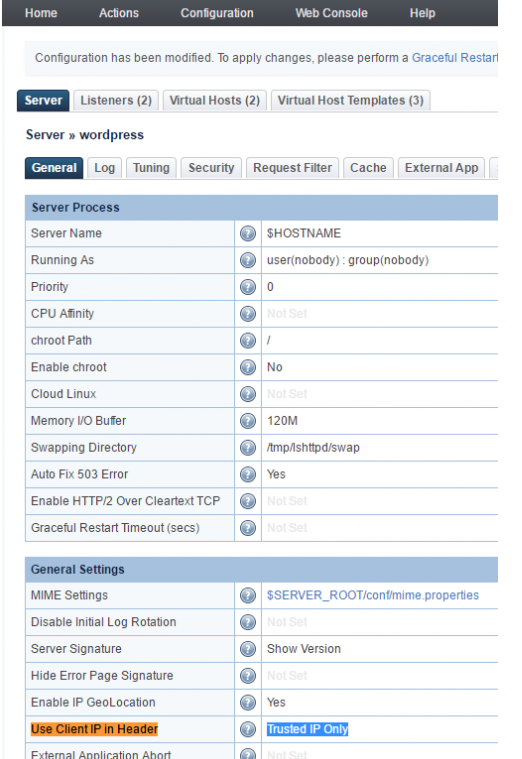
On a LiteSpeed web server with cPanel you simply need to enable the Use Client IP in header section to "Trusted IP only" in the General Settings section on the Configuration page and add proxy IPs to the trusted IP list, as shown on the following page: https://www.litespeedtech.com/support/wiki/doku.php/litespeed_wiki:config:show-real-ip-behind-a-proxy
Please go to the LiteSpeed Configuration menu and select Server and select General. In the General Settings menu you can see Use Client IP in Header please select Trusted IP Only.
After that is done, please, restart LiteSpeed. Do not forget to check the logformat whether it looks like this LogFormat:
%a %l %u %t \"%r\" %>s %b \"%{Referer}i\" \"%{User-Agent}i\" combined
You can find this menu point at the top under Log.
cPanel on an NGINX *Required for DNAT redirection only
- Open the Engintron plugin in WHM
- Click on the Edit
nginx.conf - Insert the following code before the
real_ip_header X-Forwarded-Forline:
   set_real_ip_from <Your server(s) IP address(es)>;
   real_ip_recursive on;

- If your Server has multiple IP addresses enter the IP addresses seperated by colon and space.
- If your server has a CIDR or multiple CIDR you can add them the same way with the prefixes included (IP address/X).
-
Click on the update /etc/nginx/nginx.conf button
-
Check the logformat whether it looks like this:
LogFormat %a %l %u %t \"%r\" %>s %b \"%{Referer}i\" \"%{User-Agent}i\" combined
You can find this menu point at the top under Log
Installing mod_remoteip *Required for DNAT redirection only
When the WAF 2.0 module is active, all requests will be accepted by it and it will open a new connection to your appropriate local server. This way your local server will 'see' only the IP address of the WAF. A typical symptom of this error is when your HTTP server logs every request as it was made from the local IP or 127.0.0.1.
There is a standard solution for this problem. The WAF 2.0 will add an HTTP header to every request with the real IP address. The name of the header we use is X-Forwarded-For.
If you use apache2 as a web server, there are 3 modules you can use. They all can provide this functionality. We recommend mod_remoteip.
- mod_remoteip
- mod_rpaf (only up to apache 2.2)
- like mod_extract_forwarded
Installing mod_remoteip on cPanel servers *Required for DNAT redirection only
Please follow the instructions provided on this website to configure your apache with mod_remoteip: https://grepitout.com/install-mod_remoteip-cpanel/
Additionally, you can use the following lines:
wget -O /usr/local/src/mod_remoteip.c https://raw.githubusercontent.com/infinitnet/mod_remoteip-httpd22/master/mod_remoteip.c cd /usr/local/src/ apxs -i -c -n mod_remoteip.so mod_remoteip.c
Configuring mod_remoteip *Required for DNAT redirection only """"""""""""""""""""""""
On some of the RHEL-based distrubitions, the RemoteIp module can be a better choice, as Apache2 contains it by default. You can find an example configuration below. Please specify every IP of your server in the web-server's config file.
        <IfModule remoteip_module>
            RemoteIPHeader X-Forwarded-For
            RemoteIPInternalProxy INSERT YOUR IP ADDRESS(ES) HERE
        </IfModule>
You may also need to change the log format. The %h format string should be replaced
with %a, for example, if you are using this log format:
LogFormat %h %l %u %t \"%r\" %>s %b \"%{Referer}i\" \"%{User-Agent}i\" combined
You'll need to modify it to:
LogFormat %a %l %u %t \"%r\" %>s %b \"%{Referer}i\" \"%{User-Agent}i\" combined
Installing mod_rpaf on Debian/Ubuntu
You can install the rpaf module under Debian with apt-get like this:
apt-get install libapache2-mod-rpaf
Installing mod_rpaf on CentOs and others
In RHE/RHL machines there is no pre-packaged version of the rpaf module, but you can easily compile the module by following the instructions below
Download the rpaf module
cd /root wget https://github.com/y-ken/mod_rpaf/archive/master.zip unzip master.zip
Compile the module
cd mod_rpaf-master/ apxs -i -c -n mod_rpaf-2.0.so mod_rpaf-2.0.c
Now create the file /etc/httpd/conf.d/mod_rpaf.conf with the content below
at the sample rpaf configuration part, and then restart Apache.
If you use apache2 and the rpaf module has been installed, you can enable it with:
a2enmod rpaf
Here is a sample mod_rpaf configuration:
    LoadModule rpaf_module modules/mod_rpaf-2.0.so
    <IfModule mod_rpaf-2.0.c>
        RPAFenable On

        # When enabled, take the incoming X-Host header and
        # update the virtualhost settings accordingly:
        RPAFsethostname On

        # Define which IP's are your frontend proxies that sends
        # the correct X-Forwarded-For headers:
        RPAFproxy_ips 127.0.0.1 xx.xx.xx.xx

        # Change the header name to parse from the default
        # X-Forwarded-For to something of your choice:
        #   RPAFheader X-Real-IP
    </IfModule>
Finally, restart Apache to apply the changes:
service httpd restart
Activating and Deactivating the WAF 2.0 module
Activation
- Log in to https://console.bitninja.io/
- Click on the cogwheel of your chosen server's
- Switch WAF 2.0 on.
BitNinja WAF 2.0 will be activated within 15 seconds.
Deactivation
To deactivate the WAF 2.0 module you have 3 options:
-
You can use the Dashboard and switch the WAF 2.0 module off (preferred)
-
You can use the command line (not recommended)
bitninjacli --module=WAFManager --disabled
-
You can shut down BitNinja (this is the most radical solution, but it will also disable WAF appropriately):
service bitninja stop
Issues with the WAF module?
Are you using CDN, Load Balancer or Proxy in front of your web server? Check out our guide to setup BitNinja to work properly with these services.
Configuration
BitNinja WAF 2.0 - just like other BitNinja modules - is designed to require no configuration. Essentially, it can be simply dropped in and it works with the defaults, but to avoid false positives and tune the security level the WAF 2.0 can be configured using Firewall - Web Application Firewall module.
When you start the module, the WAF will start to proxy all HTTP connections. By default, a recommended ruleset will be applied on all traffic, and the WAF 2.0 is in log only mode. To switch on the active protection, change the configuration of the default domain pattern and set the Action to "Challenge and challenge list IP"
The module configuration file is located at: /etc/bitninja/WAFManager/config.ini,
if you need to fine-tune some of the settings on your server. In some cases,
you may need to use your own custom-built Nginx with libmodsecurity. You can change the
binary-related settings in the Nginx config section.
    [nginx]
    ;binaryLocation  = '/opt/bitninja-waf/sbin/nginx'
    ;configLocation = '/opt/bitninja-waf/etc/nginx.conf'
    ;workingDirectory = '/opt/bitninja-waf/etc/'
    ;pidFileLocation = '/var/run/bitninja-waf.pid'
    ;pidfile = '/var/run/bitninja-waf.pid'
    ;group = 'bitninja-waf'
    ;user = 'bitninja-waf'
    ;configPermission = '0644'
    ;sciptPermission = '0644'
    ;updateConfigOnStart = 1
By default, WAF 2.0 will only create port redirections for public IPs. We had many issues with local/private IP HTTP checks. You can change this behavior by changing the redirection options to a per network interface basis.
    ;
    ; Enable WAF on Interfaces only.
    ; The default redirection option is for public ips only.
    ;
    [redirect_options]
    ;interface[]='eth0'
    ;interface[]='eth1'
Don't forget to sync your local configuration to the cloud with bitninjacli --syncconfigs
Web Application Firewall: Rate limiting feature
With the 2.29.0 version of BitNinja, we introduced the rate limiting feature. This is based on the WAF and SSL Terminating modules. In order to use this feature make sure that the WAF module is enabled and working on the domains, you wish to protect with this feature.
By default the feature is disabled, as the threshold is set to 0. You can enable it and set a threshold for the feature from the SSL Terminating module's config file at /etc/bitninja/SslTerminating/config.ini.
With the rate limit threshold you can limit the all-over number of connections per domain within the time frame set in the perDomainRateLimitInterval variable.
After changeing the threshold you will need to reload the SSL terminating module.
bitninjacli --module=SslTerminating --reload
Each element loaded after opening an URL counts as a request on the server where the feature is enabled.
The WAF module will respond with a 429 status code to every request that is exceeding the threshold that is set up.
Visual instructions and configuration options can be found on our knowledgebase guide.
ModSecurity
ModSecurity has very powerful audit logging, which can log every detail of a HTTP request/response. It's a great tool for System Admins to find attack attempts. But it can consume a lot of disk space, this is why it's disabled by default.
You can change this behavior by changing the action manager settings. The default actions are:
- LogToFile: save triggered incidents to
/var/log/bitninja/WAFManager - SendToShogun: creates incidents and sends it to the API server
Available actions:
- AuditLog: saves ModSecurity audit logs to
/var/log/bitninja-wafdirectory - block list: USE THIS WITH CAUTION! It will instantly block list the IP that triggers the specific rule. Please use this option only with
secrule 10, which will be generated after creating a virtual honeypot location with
bitninjacli --waf-honeypotify-uri=/path/to/malware.
    [actionmanager]
    ;log_dir = '/var/log/bitninja/WAFManager'
    ;auditlog_dir = '/var/log/bitninja-waf'
    ;default_actions[]='LogToFile'
    ;default_actions[]='SendToShogun'
    ;default_actions[]='Auditlog'
    ; Rule specific changes
    ; To instantly block list IP caught by user defined honeypot uri-s
    ;secrule[10] = 'BlackList'
Domain pattern configuration
Visual examples on the domain patterns can be found here.
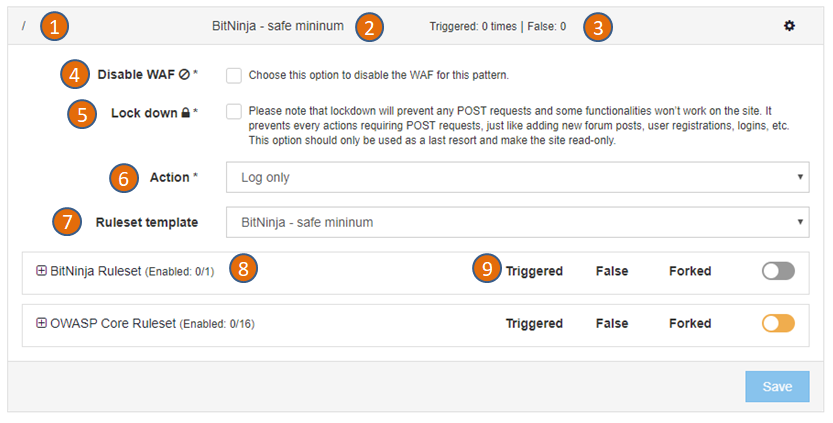
You can add custom domain patterns easily to lighten or restrict rules or completely switch off the WAF 2.0 on a per domain basis. To assign special rulesets to a domain pattern, select the pattern first and use the sliders to enable/disable any rules/rulesets.
-
This is the domain pattern. A domain pattern consist of a string and asterisk signs (*) For example
*mydomain.com/hello/*will match any request which contain themydomain.com/hello/string. So it will match mydomain.com/hello and www.mydomain.com/hello, www.mydomain.com/hello/abc too. -
This is the rule set currently applied on the domain pattern. You can change it at the (7) Ruleset template section.
-
Here you can find how many times the rule was triggered and how many times BitNinja recorded a false positive.
-
To completely disable the WAF 2.0 for this domain pattern, set the checkbox.
-
You can lock down any domain to disable POST requests and make the site read-only. This restricted mode leaves the site available for visitors but prevents most of the further hacking attempts. The lock down mode is a very agressive way to protect a site, use only as a last resort.
-
You can specify actions to be taken when a rule is triggered.
Choose „Challenge and challenge list IP” to maximize security and avoid targeted attackers and botnets from bypassing the WAF 2.0. In this case, visitors will be challenged by the BitNinja CAPTCHA page. Choose „Log only” if you don’t want to enable the protection for this domain, but you want to see all suspicious logs generated by WAF 2.0. You can use this option to test the WAF before production use.
- A ruleset template is a set of enabled rules. There are built-in ruleset templates (the ones starting with „BitNinja – „) but you can define your own ruleset templates, too. When you change a ruleset template by adding or removing a rule, all changes will be applied to all domain patterns using that ruleset template.
You can divert from the ruleset template anytime by adding or removing rules in case of a domain pattern, but the changes to the ruleset template will be still applied.
-
We provide open-source and custom-made mod_security rules and keep them up-to-date. You can activate or deactivate any rule for a given domain pattern. If you apply a ruleset template, it will switch on a set of rules, but you can still add more rules or deactivate some.
-
The 'forked' column will indicate how many rules are different (added or removed) compared to the originally selected domain template.
Safe implementation best practices
The safest way to introduce the WAF 2.0 on your servers is doing it by small steps. During the internal testing phase, we followed this implementation plan:
-
Enable WAF 2.0 on one server only: To minimize risk, enable the WAF 2.0 module first on only 1 server in Log only mode with the BitNinja default ruleset. Choose a server with a relatively low traffic to minimize any damage in case of a failure.
-
Observe the WAF 2.0: In log only mode, you can see all the logged (but not blocked) incidents using the Dashboard. https://admin.bitninja.io/ipmanager/analyze Choose
BL_BN_WAFfrom the Incident types and the server name you have enabled WAF 2.0 on. You will see the Log only incidents in light grey color.
Log only incidents won’t challenge list the IP and the connection is not interrupted by the WAF 2.0. You can monitor the incidents and manually challenge list the IPs if you find positive hits. If you find any false positives generated by the default ruleset we ship, please send it us so we can tweak the default rules.
-
Expand to other servers in Log only mode: After a couple days of observation with the first server and the generated log level incidents, you can expand the WAF 2.0 to other servers, too. Please feel free to send us any feedback about the new WAF 2.0. We are happy to help!
-
Enable active protection on some domains: If the WAF works well in Log only mode, there is a high chance it will work well in Active protection mode, too. You can enable the Active protection on some domains where you see security problems or outdated CMS versions. I recommend to use the default rule settings we provide, but you can change the settings, too if you want. We will keep updating the rules.
-
Activate global protection: The last step is to turn on the Active protection on a server level, and use the per domain settings to create exceptions. For example, if there are false positives on one website because of a default rule, it is better to disable that rule only on that domain, so you can keep the protection level high on all other sites. Or you can even choose to completely disable the protection on a domain, or use more strict settings then the defaults.
Relation to other modules
The WAF module sends incidents to the shogun and the antiflood modules.
Log files
There are two different logs related to the WAF 2.0 module.
You can find the logs of the BitNinja module responsible for managing the
nginx + lib-mod_security here: /var/log/bitninja/mod.waf_manager.log
The logs generated by nginx + lib-mod_security part of the WAF is located here:
/var/log/bitninja-waf
The detailed logs about triggered rules are located under
/var/log/bitninja/WAFManager
The log files are automatically rotated if you have logrot installed on your server. We ship the log rotating rules with BitNinja.
You can use https://admin.bitninja.io/ipmanager/analyze to inspect the latest WAF 2.0 events.
Modifying Nginx reverse proxy settings
We've tried to create a globally working Nginx reverse proxy configuration, but sometimes you may need to modify some settings.
You can change the global Nginx configuration by creating an nginx config file that matches the
/opt/bitninja-waf/etc/local_configs/global_*.conf glob file pattern.
You can even change the settings for only a specific location, if you create configuration files matching
the /opt/bitninja-waf/etc/local_configs/<LOCATION_PATTERN_CONFIG_HASH>_*.conf glob file pattern.
A LOCATION_PATTERN_CONFIG_HASH is a 16 character long hash, containing numbers and characters of the English alphabet.
E.g.: 098f6bcd4621d373
This hash is generated when you create a location pattern on the Dashboard. You can find yours - if needed - in the
/opt/bitninja-waf/etc/nginx.conf file.
The created local configuration files need to be valid Nginx configuration files. You can check whether your configuration file's syntax is correct with the following command:
service bitninja-waf configtest
Configuration changes can be reloaded with:
service bitninja-waf reload
FAQ
How can I handle false positives?
If you have found a false positive you have multiple choices to handle it. The recommended method is to create a domain pattern and disable the rule causing false positive.
You can also decide to create a domain pattern to manage the false positive on multiple
domains, too. For example, let's say a rule is causing false positive on every Wordpress
sites with a module called my_module. You can create a domain pattern like this:
*/modules/my_module/*
and deactivate the rule causing false positive.
As a last resort, you can decide to change the default pattern, too. The / pattern
matches every request that is not matched by any other domain pattern and you
can change which rules are applied on it, just like any other domain pattern.
Does the WAF 2.0 work on AWS or Azure?
Yes, it does, and you only need to configure all the interfaces that the WAF 2.0 should listen on in the
/etc/bitninja/WAFManager/config.ini file in the section called [redirect_options]:
You can check your interfaces using the following command:
ip -4 -f inet addr show
You should change the interface's name in the config.ini according to your own settings,
and remove the comment character from the start of the line, like this:
; ; Enable WAF on Interfaces only. ; The default redirection option is for public ips only. ; [redirect_options] interface[]='eth0'
After you've saved the config file, restart the WAF 2.0 module with:
bitninjacli --module=WAFManager --restart